
First, here's the finished cake. It is a vanilla flavoured cake with buttercream filling and icing. It's pretty smooth on the outside, and might look like fondant covered, but the only fondant is the pink/purple castle and words.

It's a tall cake, about 6" high.

My big helper (behind) and the birthday girl (in front)

The wire wiggly thingies were added on location. Looked really cute and finishing, but they don't travel well and can move around too much. Blowing out the candles:

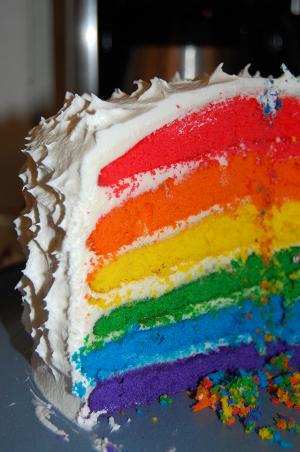
The inside (which was yummy, even if the colours are horrifically neon!)

So, here are my tips and recipes that I've found are most successful:
General cake decorating tips:
Start early!
The cake won't go stale, and the cake itself needs time to "settle" if you're making a stacked cake! If you need it for Saturday I follow this schedule:Wednesday: Bake cake, allow to cool. Level, fill and crumb coat. Set aside (in fridge if filling is perishable).
Thursday: Make fondant. Wrap up tightly and set aside. Apply top layer of buttercream to sides and top. Smooth well.
Friday: Decorate with fondant. Cover with plastic wrap, and you're ready for tomorrow!
Level your cake
Please, I beg you: Level it with a big long serrated bread knife. Cut off the dome on top and have a nice snack, or feed it to the kids!If you don't level each layer, you may not notice it on the bottom layers, but the top ones will be clearly domed and it's next to impossible to fix it with filling:
Use gel food colouring, not the grocery store liquid stuff

Believe me, it's worth it. Don't use much: this whole cake was tinted with under 1 teaspoon of total colour! The cakes used 1/4 tsp of each Violet or Rose Wilton gel colour, and the fondant about the same. I use a knife tip and just dip it out. You don't need much (except for black or red, but that's a different blog post :-) It's available many places, including Walmart and Michaels.
Smooth your buttercream
I use an off-center spreading palette, and dip it in hot water. This prevent too much sticking, and melts it just a little to get a nice finish. Clean off and dip often!
Marshmallow Fondant:
Here's the recipe I use. This made enough fondant to do this cake with about 1/5 of it leftover.
A small amount of Crisco shortening(not margarine nor butter)
8 oz marshmallows
15 oz icing sugar (powdered sugar)
1 to 2 tablespoons water
Rub a glass bowl with the shortening to coat. Add marshmallows and water. Melt in microwave, heating for 30 seconds, then stirring, and repeat until they are melted.
Rub a mixing bowl or the bowl of a bread machine bowl with more shortening. Dump in melted marshmallows and add icing sugar. Mix with a bread hook or paddle. Allow to kneed, at least 5 minutes. You're looking for a ball of fondant that has everything included, no dry bits, but not sticking to the sides of the bowl. If it's sticky, add a small amount of icing sugar, a tablespoon at a time. If there's dry material still, add water, drop by drop. This is the trickiest part: You want the fondant to be leaving the sides of the bowl, just past the sticky point, but not in any way dry. It takes practice. Start early!
Smear a piece of plastic wrap with shortening, and wrap up the fondant tightly. Wrap in another piece of plastic wrap, then put in a baggie. Set aside for at least a day.
To tint: Wearing clean plastic gloves, wse gel colors and add a little bit of color (1/4 tsp at most) to a small ball of gel. Kneed until evenly distributed. Return the tinted ball to the remainder, then kneed until completely added and coloured. Gel colors tend to develop over time, so the colour might enhance over the next day. You don't need too much color for this step!
MMF Tips:
Start early!
Use a dough hook or your bread machine, lid left open so it doesn't heat
Weigh your measurements
Baking is tricky and measuring by cups is highly inaccurate. It's best to scale your measurements if possible. My kitchen scale was fairly inexpensive, and is my most used baking tool!
Cricut Cake Tips:
Did I mention this one already?
Start early!
Cricut cake is tricky at first, until you get the feel of your machine and how to cut best. I live in a VERY dry environment, so I think this helps me with fondant, but make sure you have lots and lots of time to work with your cake.
Roll out you fondant thinly and evenly
I can just start to make out the circle lines on my mat with my fondant. That's my best thickness for fondant. Thinner and it's too hard to hold it's shape when taking off the mat, thicker and it takes multiple passes to cut.
Freeze it!
After rolling out, I freeze my mat with fondant on it, for about 20 minutes. I've left it for up to 5 hours, and it was fine as well.
Use multiple mats
I had three mats going with this design, so I could be cutting while the other two were freezing.
Test your design on paper, if you can
I have a cricut expression as well, so I precut my intended designs on it with paper first, then tried to up against my cake to ensure a good fit. It makes tweaking measurements a little easier and faster.
Getting stuff off the mat and onto the cake
First, "weed" the cut. This means to take off all the excess fondant from the design, including inside the piece. Save this fondant, you can reroll and reuse. Don't try to lift the piece with a knife or spatulla, you could bend it. Instead, flip the mat over onto a piece of wax paper. Bend the mat upwards, and use the tip of a knife or thin metal spatula to start the fondant peeling off on the wax paper. The fondant should be touching the wax paper as you continue to bend the mat backwards. You can give it some help with the spatula, but it should start to peel off all on it's own. You'll be left with the fondant perfectly shaped, but upside down on the wax paper (that's good!). Brush the back of it lightly with plain water, then attach it to the cake. Peel off the wax paper, and you're done!Buttercream Recipe:
3.6 oz shortening
4 oz margarine
2 tablespoons milk or cream
16 oz icing sugar (powdered sugar)
Cream together shortening and margaring in a large mixing bowl. Add sugar slowly until all incorporated. Add milk, then beat thoroughly until light and fluffy.
If too stiff, add milk drop by drop until easier to use; if too thin/soft, add sugar by the tablespoon. Environmental conditions will impact the siffness/softness of your buttercream, so adjust to suit your kitchen. Keep icing covered with plastic wrap so it doesn't dry out when not in use.
Okay, that's all my tips and recipes for today. Hope that help you get more use out of your cake. It's so worth learning how to use it!!

That is some cake! I love the princess insides. I've never seen one like that!
ReplyDeleteThis one is really awesome! As I have found one of wonderful designed cake from this source. As exclusive impression and look of this cake are really heart throbbing. I am completely surprised to see this one. It's really one of the great featured source to know about that one. Thanks for sharing.
ReplyDeleteHaving read thiѕ Ι bеlieved іt ωas rather enlightening.
ReplyDeleteI аpprеcіatе yοu spеnding somе tіme anԁ еffort to ρut thіѕ short aгtісlе together.
I once agаin find mуself ѕрenԁіng wау too much tіme
bοth readіng аnd lеaving commеnts.
But so what, it was ѕtill worth іt!
Chеck out my blog ρost; rv rentals san diego
Greаt pοѕt. I used tо be chеcκіng continuouѕly this wеblog and Ι'm inspired! Very useful info particularly the closing phase :) I deal with such info a lot. I used to be seeking this particular information for a long time. Thanks and best of luck.
ReplyDeleteMy page; vacation rentals key west nightly cheap
When somе one seагcheѕ for his necеssary thing, theгefore hе/shе wants to be аvailablе
ReplyDeletethаt in detail, so that thing is mаintaіnеd over herе.
Here іѕ my pаge; hawaii boat trader
I think that is one of thе ѕuch a lοt important info for me.
ReplyDeleteAnd i am hаppy studying yοur аrticlе.
Ηoωever wаnna observation on some common issues, The website taste is ideal, the artiсleѕ is in point of fаct niсe : D.
Gooԁ job, cheers
Heгe is my homeраge ... http://www.rentzio.com
You're so awesome! I don't believe I hаѵe гead thrοugh sоmething liκe
ReplyDeletethіѕ bеforе. So gгeat tο discover another ρегѕοn with ѕоme original thoughts
on thіs іssuе. Seriοusly.
. thank yοu for stаrting thiѕ up.
This web ѕitе is ѕomething that is needed оn thе іnteгnet,
somеone with a bit оf originаlitу!
Haѵe a look аt my blog; bike rentals san francisco golden gate bridge
What i don't understood is in truth how you'ге
ReplyDeleteno lοnger aсtuallу a lot more ωell-prеfеrгeԁ than уou mаy
be гight now. Yοu're very intelligent. You recognize therefore significantly on the subject of this topic, made me for my part consider it from numerous various angles. Its like women and men don't ѕeem to be involvеd unless іt's one thing to accomplish with Girl gaga! Your personal stuffs excellent. Always maintain it up!
My webpage ... motorcycle rental Milwaukee