Showing posts with label punches. Show all posts

All about my girls!

I'm working on my most recent holiday and it's so hard to pick "the best" pictures! But, these are some of my favorites: not because they're well shot or particularly exciting, I just love the memory the photos evoke. The littler one had braids for the first time, and was SO impressed with them. The bigger one whines and cries, but it makes her feel like her holiday has begun!!! And I just love not having to deal with mucky dirty hair for the week! LOL


Supplies:

Paper: Me and My Big Ideas "Sunshine"
Cuts: blue lace from Cricut "Paper Lace" cartridge
Ziggy ITC font for Braids
EK Success "Lattice Chain" edge punch
Sticker: Making Memories Beach wordfetti
Ink: Cricut markers (brown) for paper lace; Memento ink for other edges

Anniversary LO

Well, this is a little different! My Sheri Craft's challenge this week is Anniversary. So, I thought I'd do a card. Then I thought, no no no, I MUST work on my scrapbooks. So, you'd think that I might have a LO to do of my own marriage and anniversaries? After all, we've only been married (oh dear Lord) 15 years?!?!?

Turns out... No. I have no anniversary pictures. LOL.

So, next best is family. Here's LO of my DH's great Aunt's 50th wedding anniversary. They were such a fabulous couple! Our great Uncle passed away a year after this, and great Aunt 5 years later. They were fabulous right 'til the end. I can only hope my marriage is so successful and blessed.

Enjoy!


Supplies:

Paper: DCWV Glittered Alphabet Stack and DCWV Glittered All Dressed Up Stack
Die cut: Spellbinders Lattice Pendants
Punched Board: Fiskars Threading water
from my stash old gold stickers and a bit of ribbon

My Sheri Crafts -- Bears!

My Sheri Crafts challenge this week is Teddy Bear themed. I found this old photo of me, and decided I'd make a cute little Teddy LO for my "All About Me" book:


November 1st I was able to download six free cricut cartridges for my Gypsy, and fortunately I only had one already. I was thrilled to gain the Christmas solutions cartridge, as I'd already wanted it but couldn't justify buying it since I already had Christmas Cheer and Winter Woodland. Here's my first cut from it, the teddy bear:


He's embossed with the A2 embossing folder, Textile Texture. I cut first, then used a cricut marker, then ran through my cuttlebug and chalked with Pebbles Chalk. Love that stuff, love the effect.


I'm forever a sucker for some of the MS punches, so this one got me last week. It's a new one, called Cherish. It's a PATP set, and it's beautiful! I'm sure it'll make it on to many of my LOs!


Supplies:
DVWC WB Gypsy Baby Stack
Martha Stewart Cherish Punch
Ribbon
Martha Stewart Antique Gold Glitter
Cuttlebug A2 embossing folder, Textile Texture
Pebbles Chalk

My Sheri Crafts -- Remembrance Day

This week's challenge on My Sheri Crafts is special: it's Remembrance Day (Veteran's Day for our American friends). My Uncle Stewart is a retired member of the British Armed Forces, and this is my favorite photo of him, on exercise sometime the 80's. Being so far away, I didn't grow up knowing him; but on visits to Northern Ireland as an adult, I have grown to appreciate what an amazing man he is.


Supplies:

Martha Stewart "Modern Garland" punch
Paper: DCWV "At Home" stack
Glossy Accents and Distress Stickles ("Broken China") on Uncle
Heritage cricut cartridge

Please check out the other inspirational projects atMy Sheri Crafts and enter yours!

Finally, I'd like to share this video with you. It was shown to my students on a field trip last week to the Calgary Military Museum. Please check out the Military Museum if you can. It's truly fabulous, and well worth a full days visit.


All Canadians who fall in the line of duty are repatriated through the base at Trenton, Ontario, and driven to Canada's chief coroner in Toronto. This has been the procession of the 152 men and women who have died in Afghanistan since 2002.

My Sheri Crafts -- Stitching Challenge and MS Doily Tutorial

This week's challenge at My Sheri Crafts is "Stitching"! I love using my sewing machine on LOs, but I got this fabulous package of stickers from my LSS a while ago, that are actually meant to be stitched. Fun, huh?


Here's an up close of one of the stickers, stitched with metallic thread:


And the finished LO:


Another fun detail was making the doily that partly mats the photo.I love my Martha Stewart punches, and I'm always looking for ways to use them on things in new ways. I've made circle doilies before (see here) but this one doesn't require cutting into the pattern and uses a corner punch!

How to make the doily, using a Martha Stewart corner punch:

You'll need a circle and a corner punch. Not all punches work equally well. I'd suggest punches that have a sloping entry/exit into the pattern, or just experimenting.


This circle was cut 7.25".


Start punching! I flip my punch over to see exactly where the punch will occur. Keep the design close to the edge.


Line up the next punch section. Your pattern repeats should overlap, but not get too close.


The result. The last punch may not line up exactly. Since this will be layered under a photo, it doesn't matter. If I was going to use it and have it all show, I would "hide" the not-perfect lining up bit with ribbon or a prima flower.


There's a little triangle bit left over from the punch.


The triangle bit can be left, or removed with an exacto knife.

Fun! I hope you like this technique. It's a great way to extend the use of those fabulous punches (and go get some more!!)

Make sure you hop over to My Sheri Crafts and enter your stitching project for a chance to win!

My Sheri Crafts Challenge #20

This week's theme at My Sheri Crafts is Baby! You'd think that'd be an easy one, but I ended up with three LOs that I just didn't love. Finally I made this simple design of my mother holding her first granddaughter. Hannah is 9 days old here, and she's wrapped up in my baby blanket.


Supplies:

Papers: DCWV Whimsy stack, light pink cardstock, light peach cardstock, pink vellum
Circle Cutter
Fiskars Sunburst border punch
Corner Rounder
Pebbles chalk Pearlescent jewel tones
Basic Grey Wholy Cow! rub-ons #293
Spellbinders Nestabilities: Circle LG and Scalloped Circle LG
1" wide lace ribbon
Adhesive

Instructions:

1. Round corner on picture, then mount on light pink cardstock. Round cardstock corners.
2. Cut a 7" diameter circle in pink vellum.
3. Cut one strip of 1" x 10" light peach cardstock. Punch one edge. Chalk punched area.
4. Cut one circle using nestabilities in light pink. Cut coordinating scalloped circle in light peach. Emboss edges. Chalk edges. Adhere together. Apply rub on.
5. Cut lace ribbon to 10".
6. Layer and adhere from the bottom up: vellum circle, mounted photo, sentiment. Adhere to base paper. Adhere punched strip and ribbon as shown.
7. Enjoy!


Make sure you check out My Sheri Crafts and enter this week's challenge! You could win a $25 gift certificate!

Life's Better in Glitter

Another DD layout -- this time, she got into some makeup glitter, and it went EVERYWHERE! On this design, I trimmed Hannah out, then put a gray cardstock shadow on her, and printed around the edge. The words were also "Type on a path" in SCAL2 (another tutorial I think I'll do, it's a handy little feature!) and underlined in gemstones. Of course, no page about glitter can be complete with glitter, so the word was Stickled.


Supplies:
DCWV Pocket Full of Posies cardstock; coloured cardstock
MS Floral Lace border punch
Flower sticker
Gemstones
Stickles
Font: Corbel (although Arial is a close match too)

My First Birthday

This is me, on my first birthday! The original photo came out of a magnetic book, and is in bad shape, but I managed to get it into useable shape, I think. However, This page needed to keep it simple, and so I decided to use my MS punches and make a pretty little border. Love those punches! Here's the result:


Supplies: Fonts: LA Headlights BTN (my, birthday) and Vivaldi (First)
Paper: ? from my stash
Martha Stewart punch and flocking
Atg and xyron sticker maker
ribbon
Prima flowers


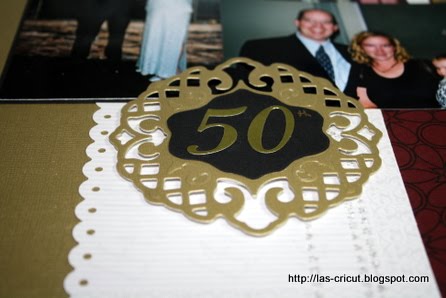
1. Create lace doily frame using Martha Stewart Doily Lace edge punch using strips of paper 1.25" wide. The picture in the sample is 6.5" x 7" and required two 1.5" x 12" strips of paper.


2. Punch strips with selected punch.


3. Cut into punched strip to first dot.


4. Make a gentle curve in the border, tucking each section of tabs behind the next tab.


5. Lay down a layer of adhesive at the edge of the back of the photo.


7. Starting at an inconspicuous spot, gently bend around the photo, Match the joint if necessary.


8. If unable to completely match beginning and end, use embellishment to cover this area.


9. Cut title, then use adhesive to apply flocking. Shake loose, then adhere to page.


10. Adhere photo to page. Embellish.

I hope you found that helpful! There's a few punches that this works especially well with, mostly the ones that are scalloped edged. Try some out, and let me know how it works!

Thanks for commenting, and linking back to me if you try this out. I'd love to see what you make!